在可视化编程时代,大多数可视化的gui开发工具都提供了按一定规则排列form中的控件的功能。但是对于java来说,支持可视化开发的工具并不多,虽然有一些这样的工具,但它们大多是第三方的产品,稳定性方面有一些欠缺。因此,在很多时候使用java编写gui程序时,就要使用布局(layout)来控制form上的控件的位置。
本文主要讨论如何使用swt中提供的布局来安排控件的位置,并通过实例来演示这一过程。在swt中提供了5种布局:filllayout, rowlayout, gridlayout, formlayout, and stacklayout。下面我将详细讨论这5种布局的使用。
filllayout
filllayout是最简单的布局。它可以将控件横向或纵向进行排列,并且其中每个控件都有同样的宽度或高度。使用filllayout一般分为2步。
1. 建立一个filllayout对象。
2. 使用setlayout方法设置shell对象的布局。
下面代码使用filllayout在shell上放了3个按钮,代码如下:
| package layout; import org.eclipse.swt.swt; import org.eclipse.swt.widgets.*; import org.eclipse.swt.layout.*; public class testfilllayout { public static void main(string[] args) { display display = new display(); shell shell = new shell(display, swt.dialog_trim); shell.settext("filllayout演示"); shell.setsize(400, 300); // 设置shell的布局 filllayout layout = new filllayout(); shell.setlayout(layout); // 向shell添加控件 button button1 = new button(shell, swt.push); button1.settext("按钮1"); button button2 = new button(shell, swt.push); button2.settext("按钮2"); button button3 = new button(shell, swt.push); button3.settext("按钮3"); shell.open(); while (!shell.isdisposed()) { if (!display.readanddispatch()) { display.sleep(); } } display.dispose(); } } |
界面如图1所示。
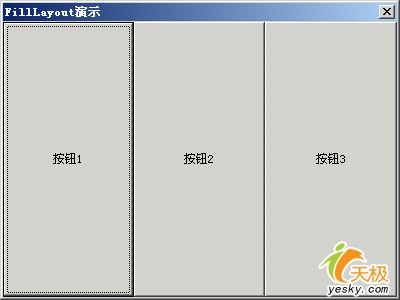 图 1 使用横向filllayout的shell界面 |
如果想要shell上的控件纵向排列,可以在建立布局时将type属性设置成swt.vertical。代码如下:
| filllayout layout = new filllayout(); layout.type = swt.vertical; shell.setlayout(layout); |
图2是控件纵向排列的效果图
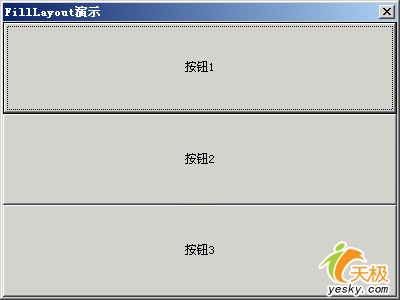 图 2 使用纵向filllayout的shell界面 |
filllayout的构造函数重载了2次。其中一个构造函数有一个参数,这个参数就是type。因此,我们也可以通过filllayout的构造函数对type赋值。
| shell.setlayout(new filllayout(swt.vertical)); |
rowlayout的功能和filllayout差不多。只是它和filllayout的最大区别是每个控件并不一定是一样大小。而且rowlayout是按行排列,这一点和filllayout是不同的。在一行排满后,就从下一行开始排列。和rowlayout配合使用的还有一个rowdata类。这个类可以设置每一个控件的大小。下面代码是一个使用rowlayout的小例子。
| package layout; import org.eclipse.swt.swt; import org.eclipse.swt.widgets.*; import org.eclipse.swt.layout.*; public class testrowlayout { public static void main(string[] args) { display display = new display(); shell shell = new shell(display, swt.dialog_trim); shell.settext("rowlayout演示"); shell.setsize(220, 200); // 将shell的布局设置成rowlayout rowlayout layout = new rowlayout(swt.horizontal); layout.spacing = 30; layout.marginleft = 30; layout.margintop = 30; shell.setlayout(layout); rowdata rowdata = new rowdata(); rowdata.height = 50; rowdata.width = 100; // 向shell添加控件 button button1 = new button(shell, swt.push); button1.settext("按钮1"); button1.setlayoutdata(rowdata); button button2 = new button(shell, swt.push); button2.settext("按钮2"); button button3 = new button(shell, swt.push); button3.settext("按钮3"); shell.open(); while (!shell.isdisposed()) { if (!display.readanddispatch()) { display.sleep(); } } display.dispose(); } } |
图3是使用rowlayout的效果图
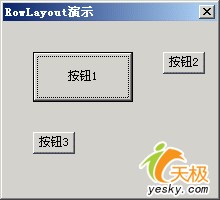 图3 rowlayout效果图 |
可以在两个地方设置和rowlayout相关的数据,一个是rowdata,它可以设置控件的大小。另外一个就是rowlayout本身,它可以设置控件开始排列的起点坐标(marginleft和margintop)、以及控件之间的间距等信息(spacing)。在rowlayout中有个很重要的属性justify。这个属性默认是false。当它为true时,将自动调整行或整列的控件,使其尽量占满一行或一列。 gridlayout
gridlayout是swt中最重要的布局。这个布局十分强大,它可以满足大多数的需要。而且它的网络可以通过composite对象进行嵌套。gridlayout有两个构造函数。一个是默认的构造函数public gridlayout()。另外一个需要两个函数public gridlayout(int numcolumns, boolean makecolumnsequalwidth)。其中numcolumns是这个网格的列数,而另外一个参数将使每一列等宽。下面的代码是一个完整的关于gridlayout的例子。
| package layout; import org.eclipse.swt.swt; import org.eclipse.swt.widgets.*; import org.eclipse.swt.layout.*; public class testgridlayout { public static void main(string[] args) { display display = new display(); shell shell = new shell(display); shell.settext("gridlayout演示"); gridlayout layout = new gridlayout(); layout.numcolumns = 3; layout.makecolumnsequalwidth = true; shell.setlayout(layout); // 建立左上角的按钮 griddata data = new griddata(griddata.fill_both); data.widthhint = 200; //按钮的初始宽度为200 button one = new button(shell, swt.push); one.settext("按钮1"); one.setlayoutdata(data); // 建立一个composite对象,并在上面放三个按钮 composite composite = new composite(shell, swt.none); data = new griddata(griddata.fill_both); data.horizontalspan = 2; // composite的占两个cell composite.setlayoutdata(data); layout = new gridlayout(); layout.numcolumns = 1; layout.marginheight = 15; layout.marginright = 150; composite.setlayout(layout); // 建立第二个按钮 data = new griddata(griddata.fill_both); button two = new button(composite, swt.push); two.settext("按钮2"); two.setlayoutdata(data); // 建立第三个按钮 data = new griddata(griddata.horizontal_align_end); button three = new button(composite, swt.push); three.settext("按钮3"); three.setlayoutdata(data); // 建立第四个按钮 data = new griddata(griddata.horizontal_align_beginning); button four = new button(composite, swt.push); four.settext("按钮4"); four.setlayoutdata(data); // 建立下面的一个长按钮 data = new griddata(); data.horizontalalignment = griddata.fill; data.grabexcesshorizontalspace = true; data.horizontalspan = 3; data.verticalspan = 2; data.heighthint = 150; button five = new button(shell, swt.push); five.settext("按钮5"); five.setlayoutdata(data); shell.pack(); shell.open(); while (!shell.isdisposed()) { if (!display.readanddispatch()) { display.sleep(); } } display.dispose(); } } |
上面的例子将网格设成3列,在第一行的第一列放置了第一个按钮。然后将一个composite对象放到第一行第二、三列(data.horizontalspan = 2),在这个对象上放到个按钮。最后在下面建立了第5个按钮。
formlayout
formlayout是swt中最复杂的布局。在这一部分我将详细讨论formlayout。这个布局虽然复杂,但它确可以对控件进行更多的控制。
formlayout和其它的布局类似,也有一个formdata类用于设置布局信息。但我其它的布局不同的是formlayout使用另外一个类来控制控件的大小和位置,这个类是formattachment。控件的上、下、左、右分别要4个formattachment对象来控制。通过这些formattachment对象可以控制当前控件如何在它的父窗口中显示,以及和其它控件的相对位置。
在formlayout中,描述位置的4个属性(left、top、right、bottom)都是一个formattachment对象。而并不是一个简单的值。在formattachment中比较常用的属性是numerator,这个属性描述控件的4个边距shell的边缘的距离。 按百分比放置控件
可以通过formattachment的numerator属性设置百分比。下面的代码将一个按钮在它的父窗口的宽度的40%处放置按钮。当shell的尽寸改变后,按钮的位置也随之变化,但按钮的大小并不改变。
| button button = new button(shell, swt.push); button.settext("按钮"); formdata data = new formdata(); data.left = new formattachment(40); button.setlayoutdata(data); |
但如果同时设置data的left和right属性又如何呢?如果是这样的话,那么这个按钮的尺寸就会改变。下面的例子将一个按钮放到水平方向中心的位置。我们可以将left的比例设计为40%,而right的比例设置60%。如果这样设置,无论窗体如何变化,这个按钮始终在水平方向的中心。这是一个简单的数学计算。如果一个按钮的左边在40%的位置,而右边在60%的位置,也就是说,按钮的右边距窗体的右边也是40%。这样可以算出,按钮的宽度占窗体的20%(哈哈,要想使用formlayout,可要有一定的数学基础啊!)。
| button button = new button(shell, swt.push); button.settext("按钮"); formdata data = new formdata(); data.left = new formattachment(40); data.right = new formattachment(60); button.setlayoutdata(data); |
不过在使用formattachment同时给left和right或top和bottom赋值时,不能将这两个比例设成一样的,要不就将按钮压扁了(按钮看不到了,宽或高为0)。如果想要按钮在中心位置,这两个比例的和必须是100。而且left(top)的比例要小于right(bottom)的比例。
设置控件的偏移量
swt之所以提供了布局,目的就是让你尽量少使用绝对坐标来设置控件。但在有时,我们又必须使用绝对坐标。如果是这样的话,你可以使用控件的setlocation来设置,也可以使用formattachment提供的偏移量去达到同样的效果。
| formdata data = new formdata(); data.left = new formattachment(0, 20); data.top = new formattachment(0, 40); button.setlayoutdata(data); |
上面的代码相当于setlocation(20, 40),即将按钮设置的位置设置成(20, 40)。
根据其它控件的调整位置
一般在窗体上都有不只一个控件,这些控件之间都是有一定关系的,它们的位置也是相对的。因此,formlayout为我们提供了根据其它控件设置当控件位置的方法。如根据另外一个控件设置当前控件左边或右边的位置。
下面的例子将根据一个按钮的位置设置另外一个按钮的位置。有两个按钮,第二个按钮根据第一个按钮的底边设置自己的位置。
| button button1 = new button(shell, swt.push); button1.settext("按钮1"); formdata data1 = new formdata(); data1.top = new formattachment(20); data1.left = new formattachment(40); data1.right = new formattachment(50); button1.setlayoutdata(data1); // 第二个按钮 button button2 = new button(shell, swt.push); button2.settext("按钮2"); formdata data2 = new formdata(); data2.left = new formattachment(button1, 0, swt.center); data2.top = new formattachment(button1); button2.setlayoutdata(data2); |
上面的"按钮2"将根据"按钮1"将自己水平方向的位置设置成"按钮1"的中心位置。
我们在最后一部分来讨论stacklayout,并不是因为stacklayout在这5种布局中最复杂,而是这个布局并不在org.eclipse.swt.layout中,而在org.eclipse.swt.custom中。从这个布局的名子可看出,它是将许多swt控件放到一个集合中,这些控件有同样的尺寸和位置。但只有在最上面的控件才能被显示。
stacklayout只有一个空的构造函数,它只有一个属性topcontrol,这个属必确定了哪一个控件可以被显示。这个属性默认值是null,也就是说,如果不设置它,那将没有控件被显示在窗体上。但要注意的是,设置topcontrol并不会将stacklayout中控件删除。
| package layout; import org.eclipse.swt.events.*; import org.eclipse.swt.widgets.*; import org.eclipse.swt.custom.stacklayout; import org.eclipse.swt.swt; public class teststacklayout { public static void main(string[] args) { display display = new display(); shell shell = new shell(display); stacklayout layout = new stacklayout(); shell.setlayout(layout); stacklayoutselectionadapter adapter = new stacklayoutselectionadapter(shell, layout); button one = new button(shell, swt.push); one.settext("按钮1"); one.addselectionlistener(adapter); button two = new button(shell, swt.push); two.settext("按钮2"); two.addselectionlistener(adapter); button three = new button(shell, swt.push); three.settext("按钮3"); three.addselectionlistener(adapter); layout.topcontrol = one; shell.open(); while (!shell.isdisposed()) { if (!display.readanddispatch()) { display.sleep(); } } display.dispose(); } } class stacklayoutselectionadapter extends selectionadapter { shell shell; stacklayout layout; public stacklayoutselectionadapter(shell shell, stacklayout layout) { this.shell = shell; this.layout = layout; } public void widgetselected(selectionevent event) { control control = layout.topcontrol; control[] children = shell.getchildren(); int i = 0; for (int n = children.length; i < n; i++) { control child = children[i]; if (child == control) { break; } } ++i; if (i >= children.length) i = 0; layout.topcontrol = children[i]; shell.layout(); } } |
上面这个例子在shell上有三个按钮,通过按最上面显示的按钮,这三个按钮循环交替显示。

 闽公网安备 35060202000074号