如果你是从事java软件和ajax开发的程序员,那么你应该已经注意到了google web toolkit(gwt)所带来的机遇。google于2006年5月按照apache规范许可证发布这套免费的开发包。gwt 支持开发者使用java 语言开发 ajax 应用程序。
如果你是从事java软件和ajax开发的程序员,那么你应该已经注意到了google web toolkit(gwt)所带来的机遇。google于2006年5月按照apache规范许可证发布这套免费的开发包。gwt 支持开发者使用java 语言开发 ajax 应用程序。google已经推出了在windows和linux平台上的gwt beta版本,并且承诺不久将增加在mac os x平台上的版本。
本文将介绍使用gwt和常用的java工具――如tomcat 5.0 servlet的容器apache ant,还有intellij idea集成开发环境(后者是商业化的ide)―― 在mac os x平台上开发一个简单的ajax应用的步骤。本文是建立在读者对java和ant有所了解的基础上。
gwt配合使用ant
我下载了gwt linux beta版本,并使用java编写一个小应用程序,然后通过调用一个ant构建文件在tomcat 5.0的实例上编译和部署该应用程序。这个ant文件调用gwt的java-to-javascript编译器。该“编译器”是命令行脚本,它执行一个gwt java类把应用程序的java代码转为javascript。
我们可以通过两种开发模式来使用gwt beta版:宿主模式和web模式。
宿主模式是指使用gwt内置的浏览器的中间开发步骤(在这种情况下,java虚拟机使用gwt内置的浏览器运行gwt应用编译后的class内容);使用这个模式,编译后的代码仍然运行在java虚拟机上(jvm)上。但是,我们这些mac os x操作系统的用户无法顺便使用linux gwt的宿主模式。只要gwt的mac os x发布,宿主模式就可以使用了。
不同风格的web开发
本文深入研究了gwt开发人员在为远程过程调用(prcs)创建服务时可能会遇到的一些典型的web开发相关工作。prcs是使用面向服务架构的应用程序的软件模型的一部分。这些开发工作包括:
• 使用一个构建文件使开发和配置的步骤自动化,(这个构建文件调用gwt编译器,然后把编译器的输出以及服务器端的java类文件配置到servlet容器中,比如tomcat, jetty或者 resin)
• 使用firefox的dom inspector监测由gwt应用程序生成的html。
• 在不访问底层html的情况下重新设计页面中的窗口部件(因为你正在使用gwt的java api)。
• 确保html在合理范围内扩展,比如,基于一个你的组织所需要的特殊xhtml文档类型。
在你的服务中
首先,我将简要描述一下这个应用程序所创建的服务。这样结合图示能够更加清晰地讲解gwt所使用的模型。
这个应用程序在浏览器中显示为一个表单,要求用户输入姓名、年龄和国籍。当用户点击按钮提交表单时,应用程序在文本框里直接显示服务器的响应结果,而不需要刷新页面。图1显示了在safari浏览器中应用程序的运行结果。
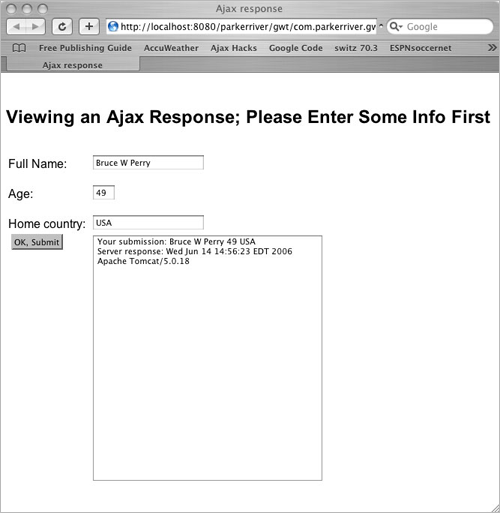
图1 :gwt生成的简单视图
例如,当用户没有填完表单就点击ok,submit按钮时,图2显示了响应结果。
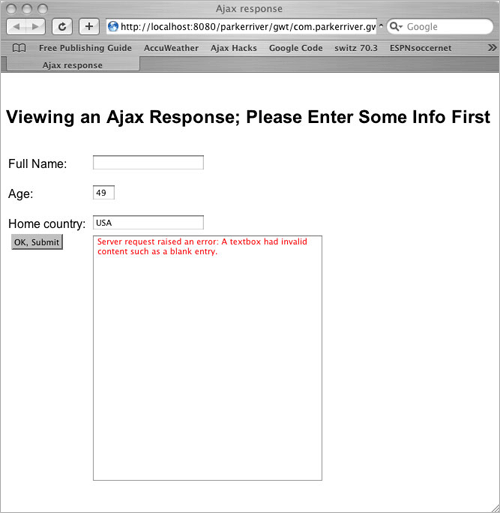
图2:应用程序用红色显示出错信息
极好的服务机制
在ajax请求中使用rpc就可以不必处理 xmlhttprequest,而且还能关联服务器返回值,这是因为gwt对象处理了plumbing。
应用程序中定义的每个服务都要有两个java接口和一个java类。为了编译这些类,你必须确保gwt-user.jar库在你的classpath中(有一个ant文件将对此进行验证)。下面是定义服务的其中一个java接口的代码示例。
package com.parkerriver.gwt.testapp.client;
import com.google.gwt.user.client.rpc.remoteservice;
public interface showrespservice extends remoteservice{
string displayresponse(string req);
}
扩展gwt的remoteservice接口时需要这个服务接口。它定义了displayresponse()这一方法。
你同时还需要定义另外一个接口,客户端或者最终下载的javascript代码将使用它来调用上述的服务方法。gwt使用callback设计模式,这个我将在客户端代码中描述(请参考myform.java)。
package com.parkerriver.gwt.testapp.client;
import com.google.gwt.user.client.rpc.asynccallback;
public interface showrespserviceasync {
public void displayresponse(string s,
asynccallback callback);
}
使用gwt定义服务需要一定的命名惯例;在服务接口名称 (showrespservice)的末尾添加“async”后缀。asynccallback对象是gwt api的一部分,它是为了处理客户端的服务响应。只要你看到代码就会明白它的具体操作。这些定义对象的java代码是用于生成应用程序的客户端的javascript。
任何其他名字的servlet
最后,你必须定义一个java 类来实现远程服务接口。这个类是用在ajax应用程序的服务器端。
package com.parkerriver.gwt.testapp.server;
import com.parkerriver.gwt.testapp.client.showrespservice;
import com.google.gwt.user.server.rpc.remoteserviceservlet;
import java.util.date;
public class showrespserviceimpl extends remoteserviceservlet
implements showrespservice {
public string displayresponse(string req) {
if(req.length() < 1) {
throw new illegalargumentexception(
"blank submissions from the client are invalid.");
}
stringbuffer buf = new stringbuffer("your submission: ");
date date = new date();
string serverinfo = this.getservletcontext().getserverinfo();
buf.append(req);
buf.append("\n");
buf.append("server response: ");
buf.append(date.tostring());
buf.append("\n");
buf.append(serverinfo);
return buf.tostring();
}
}
这个类必须扩展remoteserviceservlet――一个gwt api对象并且扩展了javax.servlet.http.httpservlet。换句话说,你必须在servlet容器中配置这个类和它所实现的接口。
步骤
现在服务已经定义好了,让我们花一分钟的时间来看一下应用程序的目录结构。google web toolkit包括一个命令行脚本――applicationcreator,它将生成一个基础框架目录结构。解压下载的gwt包之后,你可以在根目录中找到applicationcreator。我习惯于从下面的命令行开始进行介绍:
applicationcreator -out /users/bruceperry/1gwt/secondapp/ com.parkerriver.gwt.testapp.client.myform
图3 显示了目录结构。
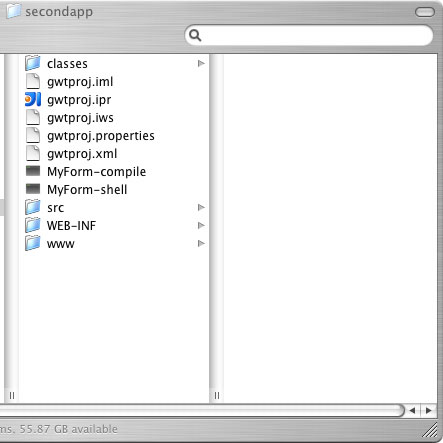
图3:一个gwt和intellij项目的目录
applicationcreator生成./src目录、myform-compile脚本和myform-shell脚本。我的ant文件执行myform-compile脚本; 另外一个脚本在gwt配置完全之后启动宿主模式。./src这个目录所包括的嵌套目录是与你的初始包名相匹配的,如图4所示。
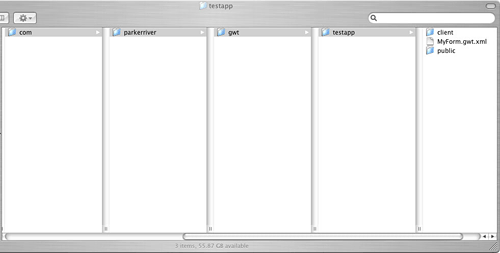
图4:gwt应用中的一个java包和模块
myform.gwt.xml文件是gwt调用模块时所用到的一个已生成的配置文件。它指定了表示程序“入口点” 的java类,类似于含有main()函数的java类。
<module>
<!-- inherit the core web toolkit stuff. -->
<inherits name='com.google.gwt.user.user'/>
<!-- specify the app entry point class. -->
<entry-point class='com.parkerriver.gwt.testapp.client.myform'/>
</module>
其他的文件和目录都是intellij web应用项目所必需包括的,有./classes、./web-inf和 ./gwtproj.ipr,因此你不需要专门花费精力在这些目录和文件上。
另外,./www目录只有当你运行gwt编译器生成应用程序代码时才会显示出来(除非是你自己创建的)。在我的项目中使用的是gwtproj.xml这个ant文件和gwtproj.properties中定义的属性。在我展示ant 构建文件之前,我们先看看myform.java 这个类,它是应用程序的入口点。
入口点
myform.java类执行gwt api的entrypoint接口。结果是,这个类必须执行onmoduleload()方法,因为当浏览器加载ajax应用程序时,浏览器的javascript引擎需要调用该方法。
换句话说,gwt编译器把这个类编译成为javascript代码。myform.java类为浏览器视图创建表单窗口部件。这个类也决定了用户在点击ok, submit按钮时所要做的响应。代码中的注释已经把操作描述得非常清楚了,因此本文中我不再赘述。
package com.parkerriver.gwt.testapp.client;
import com.google.gwt.core.client.entrypoint;
import com.google.gwt.core.client.gwt;
import com.google.gwt.user.client.dom;
import com.google.gwt.user.client.window;
import com.google.gwt.user.client.element;
import com.google.gwt.user.client.rpc.servicedeftarget;
import com.google.gwt.user.client.rpc.asynccallback;
import com.google.gwt.user.client.ui.*;
import java.util.iterator;
public class myform implements entrypoint {
//the id pf the html div element that provides
//status info
private string statusid = "status";
//a grid object; actually, an html table
private grid grid = new grid(5, 2);
//other user interface objects
private label nmlab = new label();
private label agelab = new label();
private label homelab = new label();
private textbox nmtxt = new textbox();
private textbox agetxt = new textbox();
private textbox hometxt = new textbox();
private button okbut = new button();
private textarea tarea = new textarea();
/* this method is called when the browser loads
the application. the method sets up 3 labels and textboxes; as
well as a button and the textarea that will display the server's
response. */
public void onmoduleload() {
//set up labels and text fields
nmlab.settext("full name:");
nmtxt.setmaxlength(25);
agelab.settext("age:");
agetxt.setvisiblelength(3);
agetxt.setmaxlength(3);
homelab.settext("home country:");
hometxt.setmaxlength(25);
//place these widgets within the grid
grid.setwidget(0,0,nmlab);
grid.setwidget(0,1,nmtxt);
grid.setwidget(1,0,agelab);
grid.setwidget(1,1,agetxt);
grid.setwidget(2,0,homelab);
grid.setwidget(2,1,hometxt);
//set up button and textarea
tarea.setcharacterwidth(40);
tarea.setvisiblelines(25);
okbut.settext("ok, submit");
//give the button its behavior by adding a listener object;
//literally, a clicklistener object that has an
//onclick event handler.
okbut.addclicklistener(new clicklistener() {
public void onclick(widget sender) {
//notify the user of the remote
//procedure call status; see method below
showrpcstatus(true);
//create an instance of the client-side stub for our
//server-side service.
showrespserviceasync respservice =
(showrespserviceasync) gwt
.create(showrespservice.class);
servicedeftarget endpoint = (servicedeftarget) respservice;
//the implementation of our service is an instance
//of remoteserviceservlet, so provide the server path
//to the servlet; this path appears in web.xml
endpoint.setserviceentrypoint("/parkerriver/s/showresp");
//this interface handles the response from the server.
//it will display the server's response in a textarea.
//the display will be in a red color if the message
//represents an error.
asynccallback callback = new asynccallback() {
public void onsuccess(object result) {
//if there is one, remove the 'warning' css style
//relating to any error text's appearance
if(tarea.getstylename().
equalsignorecase("warning")){
tarea.removestylename("warning");
}
//textarea displays the server's return value
tarea.settext((string)result);
}
public void onfailure(throwable caught) {
//textarea displays any exception messages
tarea.setstylename("warning");
tarea.settext(
"server request raised an error; java exception : "+
caught == null ? "an unknown exception" :
caught.getmessage());
}
};
//call the service method, validating the form
//values first.
try{
respservice.displayresponse(
getpaneltextcontent(grid,true),
callback);
} catch (exception e) {
tarea.setstylename("warning");
tarea.settext("server request raised an error: "+
e.getmessage());
} finally {
//remove the status message when we are finished
//making the rpc call
showrpcstatus(false);
}
}
});
//now add these widgets to the grid
grid.setwidget(3,0,okbut);
grid.setwidget(3,1,tarea);
//set the vertical alignment for the ok button's cell
grid.getcellformatter().setverticalalignment(3,0,
hasverticalalignment.align_top);
//set the vertical alignment for the textboxes,
//in order to line them up properly
grid.getcellformatter().setverticalalignment(0,1,
hasverticalalignment.align_bottom);
grid.getcellformatter().setverticalalignment(1,1,
hasverticalalignment.align_bottom);
grid.getcellformatter().setverticalalignment(2,1,
hasverticalalignment.align_bottom);
//add the grid, actually an html table, to a div element
//in the browser's html with id value "gridholder"
rootpanel.get("gridholder").add(grid);
}
/*initiate a simple check for blank fields, then return the
submitted values as a single string.
haswidgets is an interface that grid and other panel type
objects implement. therefore, we can pass the grid into
this method; iterate over its contained textboxes, and
validate the textbox's content.
*/
private string getpaneltextcontent(haswidgets paneltype,
boolean validatecontent) {
stringbuffer buf = new stringbuffer("");
string tmp = null;
if(paneltype != null) {
//for the sake of brevity, clipped...
}
//return the textboxes content each
//separated by a space
return buf.tostring();
}
/* overly simplified validation! */
private boolean validatetext(string _content){
return _content.length() > 0;
}
private int gettextboxcount(haswidgets ptype){
//not shown: returns the number of textbox widgets
//in the panel
}
/* show the user a status message if the
response takes long to arrive.*/
private void showrpcstatus(boolean _on){
//use the gwt dom api for javascript dom
//programming
element el = dom.getelementbyid(statusid);
if(el != null) {
if(_on) {
dom.setstyleattribute(el,"font-size","1.2em");
dom.setstyleattribute(el,"color","green");
dom.setinnerhtml(el, "fetching server info...");
} else{
dom.setinnerhtml(el, "");
}
}
}
}
前面这些代码大都是处理gwt api的。请注意:如果你必须实现javascript dom编程,比如说在showrpcstatus()方法中,那么你可以在java中使用com.google.gwt.user.client.dom这个类完成。
构建文件
下面列举一些ant构建文件的优势;它能够:
1. 把java文件编译到项目中的./classes目录下。
2. 执行gwt编译脚本(上例中称为 myform-compile脚本)。
3. 把在./www目录下生成的结果代码转移到已经在tomcat上配置好的规模更大的web应用程序中。
4. 把编译后的java servlet和相关接口复制到相同的web应用程序中。
ant构建文件要完成两项任务:编译java类以及初始化从java代码到javascript的转化,如果上述操作出现任何问题的话,全部构建都将失败。
ant xml
这是gwtpoj.properties 文件所包含的内容的一部分:
web.deploy.location=/users/bruceperry/parkerriver/gwt
web.classes.location=/users/bruceperry/parkerriver/web-inf/classes
下面的xml仅仅体现了ant文件的优势;整个文件链接在本文的源代码部分。
| <?xml version="1.0" encoding="utf-8"?> <project name="gwtproj" default="all"> <property file="gwtproj.properties"/> <!-- the top-level directory for the project and where the ant file resides --> <dirname property="module.gwtproj.basedir" file="${ant.file}"/> <!-- the ./classes directory inside the top-level directory --> <property name="gwtproj.output.dir" value= "${module.gwtproj.basedir}/classes"/> <!-- this target calls myform-compile to create all the content in the ./www directory --> <target name="gwt-compile" depends= "compile.production.classes" description="use gwt's compiler"> <delete> <fileset dir="${web.deploy.location}" includes="**/*"/> </delete> <exec executable= "${module.gwtproj.basedir}/myform-compile" failonerror="true"/> <copy todir="${web.deploy.location}"> <fileset dir= "${module.gwtproj.basedir}/www"> </fileset> </copy> </target> <target name="compile.production.classes" description= "compile the gwtproj production classes"> <mkdir dir="${gwtproj.output.dir}"/> <javac destdir="${gwtproj.output.dir}" debug= "on" failonerror="true" nowarn= "off" memorymaximumsize="128m" fork= "true" executable="${module.jdk.home.gwtproj}/bin/javac"> <classpath refid="gwtproj.module.classpath"/> <src refid="gwtproj.module.sourcepath"/> </javac> </target> <!-- copy the java servlet classes to the web application --> <target name="deploy.classes" depends="gwt-compile" description="copy classes to web directory"> <copy todir="${web.classes.location}"> <fileset dir="${gwtproj.output.dir}"> </fileset> </copy> </target> <target name="all" depends="deploy.classes" description="build all"/> </project> |
你可以直接在ide(如intellij)中或者通过在包含构建文件的目录中使用下面这个命令行来运行上述的ant文件。
| ant -buildfile gwtproj.xml |
通常,在修改了应用程序并且运行ant文件之后,你就可以通过重新加载浏览器页面来看到变化了。
最后的部署
你必须了解的最后的部署就是把gwt-user.jar库添加到你的web应用程序的/web-inf/lib目录下。
我在自己的jar文件中删除了javax包,并且把它重新命名为gwt-user-deploy.jar,然后添加到/web-inf/lib目录下。这样做是因为如果jar文件中包含了servlet api类,tomcat就不会加载单独的web应用程序的库文件了。
web开发人员的沉重打击
applicationcreator 同时也创建了你的ajax应用程序的html 前端程序,在这个例子中我们称为myform.html。
如果你的应用程序html必须符合一种标准,如xhtml transitional标准或者xhtml strict标准,那么应该如何修改呢?就xhtml transitional标准而言,我首先把必需的doctype声明添加到myform.html的顶部,同时也添加html标记的相关属性:
| <!doctype html public "-//w3c//dtd xhtml 1.0 transitional//en" "http://www.w3.org/tr/2000/rec-xhtml1-20000126/dtd/xhtml1-transitional.dtd"> <html xmlns="http://www.w3.org/1999/xhtml" xml:lang="en" lang="en"> |
当时,我把myform.html上传到了http://validator.w3.org/这个网站。
在运行完validator之后,我对html做了一些简单的修改,比如适当地删除meta标记,以及把type="text/javascript"添加到script标记中。
对于strict标准: 很棒,很棒
但是,如果你希望应用程序能够符合xhtml strict标准,那么就需要进行一些更加复杂的修改。比如说,w3c的validator是被标记为“未定义元素”的、iframe标记需要能够支持gwt的历史记录(与浏览器回退按钮所提供的功能相同)。现在,xthml strict标准已经除去了iframe元素。
这对你来说可能不是问题(因为随着gwt未来版本的发布,所有这些表面问题都有可能被解决);但是,你可以实现可选的策略,如扩展gwt的类或者创建适合你自己的窗口部件。
把窗口部件调整到合适位置
web开发中经常遇到的问题是应用程序的可视化设计。这个项目的设计者希望页面看起来就像是在adobe illustrator中创建的一样,可以么?
虽然做一个复杂的ajax项目可能很难达到非常完美的视觉效果,但是至少你可以使用firefox的 dom inspector来监测java类最终所生成的html。然后从这里找到缺点进行修改。
现在看一下firefox's tools=>dom inspector的菜单项(图5)。

图5:dom inspector提供幕后监测
从上面的图中可以看到:你在java代码中所使用的com.google.gwt.user.client.ui.grid对象最终是作为html table 标记来执行的。表中的td标记包含了ok, submit按钮,而且与值为"verticle-align:top"的style属性相关联。
在上面的图中,ok, submit按钮是与文本区的顶部排列在一条直线上的。下面是myform.java类中与启动正确队列相关的java代码:
//set the vertical alignment for the ok button's cell
grid.getcellformatter().setverticalalignment(3,0,
hasverticalalignment.align_top);
如果代码中没有上面的调用,那么这个按钮就会毫无规律的飘浮在文本区的中部。现在,让我们来把这个按钮左对齐并且添加标记。
资源
• google web toolkit: http://code.google.com/webtoolkit/
• 本文中源代码下载: gwtarticle_jul06.zip

 闽公网安备 35060202000074号