如果不用框架来开发一个门户站点将会是一件很困难的事。使用模版可以减少些麻烦。他可以让你在眨眼之间方便的更新与部署站点上的内容。用struts模版标签可以帮助你开发以模版为基础的门户站点。
这篇文章解释了与门户有关的一些基本的模版思想,介绍了struts对于模版的支持,围绕着struts模版标签进行了讨论。本文还阐述了其他的一些模版机制。
获得struts
网络应用程序框架使用mvc模式,能简化网络站点的开发。struts正是这样的一个框架。它提供了类集、标签库和一些能作为web开发基础的接口。struts是jakarta-apache论坛下的一个开源项目。
和所有jakarta的项目一样,struts提供原代码和二进制程序的下载。这篇文章里,我们使用struts的1.1b2版本。虽然这不是一个正式的版本,但这个版本比起1.0.2版有许多重大的改进。
首先,解压缩二进制程序到你所指定的目录。会有一个名为jakarta-struts-1.1-b2的目录创建。在它之下有两个子目录,分别为lib和webapps。lib目录包含我们所需要的所有库、dtd文件、tld文件(标签库定义),我们需要把它们添加到应用程序的classpath中。webapps目录包含了许多.war(web程序包)文件。这些可安装运行的war文件可以放到任意servlet容器的webapps目录中。我们使用tomcat作为servlet容器。
模板基础
我们通过模版可以创建很多结构相似的东西。模版帮助我们将会改变的东西归档打包,避免许多重复的工作。这对创建网络应用程序的确是一件很方便的事情。
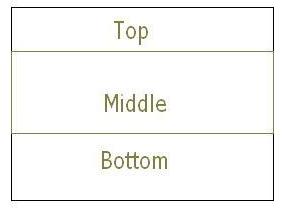
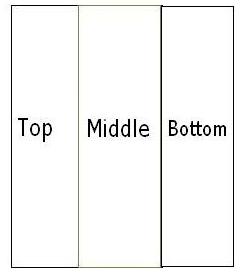
在大多数的网络应用程序中,经常需要更换的是内容。jsp很容易做到这一点。因为jsp默认提供一个include机制―― 用java提供的布局管理机制可以帮我们更形象的理解这些问题。java提出了布局管理器、组件、容器的概念来创建图形界面的应用程序。 当容器中的组件改变时,布局管理器会决定怎么样将新的组件部署到容器中。此外,容器本身也可以做为其他容器的组件从而实现了嵌套。在一些简单的情况下,jsp就可以做为一个网络应用程序的模版,其功能就等价于布局管理器。模版隐藏了web页面布局的实现方法。换句话说,它隐藏了布局的法则。假如布局法则需要改变,那么这些改变将回受限于模版。web页面通过实现这个模版来做其内容上的改变。 如果模版等价于布局管理器,那相应的容器和组件又是什么呢?相应的组件就是实际的内容文件:jsp文件、html文件、图象文件等等。容器将这些可见的组件聚集在一个单元里。一个jsp文件就是一个容器。容器需要关于模版的信息来部署这些组件。用java gui举例来说,一个面板(容器,集合单元)可以包含按钮和文本区(组件和内容),使用一个网格布局管理器(gridlayout)来部署这些组件。 现在我们可以来回答先前提出的那个问题了。我们知道模版集成了布局法则,当要改变布局是,我们要做的仅仅改变模版。这些改变会一起相关页面布局的改变,而不需要去改变这些页面本身。在门户应用程序中,这就意味着当大量页面需要采用同样布局时在时间上的节省。 struts用三个模版标签来实现模版。 插入标签inserttag―― 在容器/集合单元文件(collecting unit file)中使用。它定义了当前容器要使用的模版。类似于java gui中的container.setlayout(layout)方法。在它之后用 放入标签puttag―― 在容器/集合单元文件(collecting unit file)中使用。他定义了组成容器/集合单元的组件/内容。它类似于java gui中的container.add(component)方法。每个puttag标签必须有一个相关组件的名称。 获得标签gettag―― 在模版文件中使用。它告诉模版由puttag标签定义的不同组件的名称。它类似于java gui中的layout.addlayoutcomponent(componentname, component)方法。 一个简单的例子 你可以下载这个例子。我们将要创建两套内容文件、容器(集合单元)文件以及模版文件。当我们有了这些文件后,就可以就可以互换他们的模版,看到他们在布局上的改变。 复制struts-blank.war到tomcat的webapps目录并且将他改名为template-example.war。重起tomcat。template-example会由tomcat自动部署。删除pages目录和index.jsp文件。他们与我们的讨论暂时无关。 让我们定义又定义我们自己的内容文件做为一个开始。在template-example下建立一个名为content的目录,并且在其中创建六个文件:top1.htm, top2.htm, bottom1.htm, bottom2.htm, middle1.jsp, and middle2.jsp。 放入什么文件是取决于你的,但是对于初学者,静态的.htm文件更容易理解。举个例子来说,top.htm包括以下的内容: this is the top content for the first example. this is a static html file. 类似的,middle1.jsp包括如下内容: this is the middle content for the first example. this is a dynamic jsp file and the current date and time is <%= new date() %> 定义了内容之后,让我们来定义两个模版。 在template-example下建立名为templates的目录,并在其下创建两个文件template1.jsp和template2.jsp。 这些模版定义了两种布局方式,如下图所示。 我们如下来定义这两个模版: <%@ taglib uri='/web-inf/struts- template.tld' prefix='template' %> 定义 template 1 <%@ taglib uri='/web-inf/struts- template.tld' prefix='template' %> 定义 template 2 注意到这两个模版定义了两种布局方式,换句话说,它们定义了两种不同的布局法则。 我们已经有了我们自己的内容和模版。现在我们需要的是容器文件。在tomcat-example目录下创建两个容器文件分别名为container1.jsp和container2.jsp。容器文件需要包含组件(内容)。同样,容器文件利用template insert和put tags标签来逐个定义使用和加入的组件(内容)。 让我们带着这些概念看一下其中的一个容器文件(container1.jsp)。 <%@ taglib uri='/web-inf/struts-template.tld' prefix='template' %> 我们可以打开浏览器,输入http://localhost:8080/template-example/container1.jsp看看这个文件的实际输出。你会看到如下的页面: 在这个页面的后面,container1.jsp使用模版template1.jsp来定义输出页面的布局并且从不同的组件中包含内容。注意这里属性direct的用法 container2类似,所不同的只是他使用template2,页面输出如下: 我们到目前位置所做的工作的优点是显而易见的。举例来说,我们可以用template2替换template1(通过简单的复制和粘贴用template2.jsp替换template2.js1)。之后container1.jsp会马上变成如下的模样。我们改变了容器的布局却没有碰container1!这就是模版的作用。 struts template vs. tiles 从struts 1.1开始,引入了另一种模


 闽公网安备 35060202000074号