引言
文件的上传和下载在j2ee编程已经是一个非常古老的话题了,也许您马上就能掰着指头数出好几个著名的大件:如smartupload、apache的fileupload。但如果您的项目是构建在struts+spring+hibernate(以下称ssh)框架上的,这些大件就显得笨重而沧桑了,ssh提供了一个简捷方便的文件上传下载的方案,我们只需要通过一些配置并辅以少量的代码就可以完好解决这个问题了。
本文将围绕ssh文件上传下载的主题,向您详细讲述如何开发基于ssh的web程序。ssh各框架的均为当前最新版本:
?struts 1.2
?spring 1.2.5
?hibernate 3.0
本文选用的数据库为oracle 9i,当然你可以在不改动代码的情况下,通过配置文件的调整将其移植到任何具有blob字段类型的数据库上,如mysql,sqlserver等。
总体实现
上传文件保存到t_file表中,t_file表结构如下:
 图 1 t_file表结构 |
其中:
?file_id:文件id,32个字符,用hibernate的uuid.hex算法生成。
?file_name:文件名。
?file_content:文件内容,对应oracle的blob类型。
?remark:文件备注。
文件数据存储在blob类型的file_content表字段上,在spring中采用oraclelobhandler来处理lob字段(包括clob和blob),由于在程序中不需要引用到oracle数据驱动程序的具体类且屏蔽了不同数据库处理lob字段方法上的差别,从而撤除程序在多数据库移植上的樊篱。
1.首先数据表中的blob字段在java领域对象中声明为byte[]类型,而非java.sql.blob类型。
2.数据表blob字段在hibernate持久化映射文件中的type为org.springframework.orm.hibernate3.support.blobbytearraytype,即spring所提供的用户自定义的类型,而非java.sql.blob。
3.在spring中使用org.springframework.jdbc.support.lob.oraclelobhandler处理oracle数据库的blob类型字段。
通过这样的设置和配置,我们就可以象持久化表的一般字段类型一样处理blob字段了。
以上是spring+hibernate将文件二进制数据持久化到数据库的解决方案,而struts通过将表单中file类型的组件映射为actionform中类型为org.apache.struts.upload. formfile的属性来获取表单提交的文件数据。
综上所述,我们可以通过图 2,描绘出ssh处理文件上传的方案:
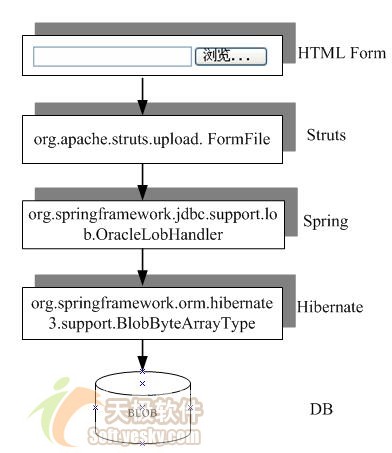 图 2 ssh处理文件上传技术方案 |
文件上传的页面如图 3所示:
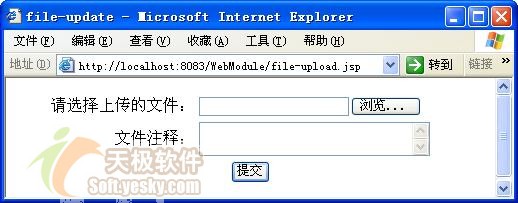 图 3 文件上传页面 |
文件下载的页面如图 4所示:
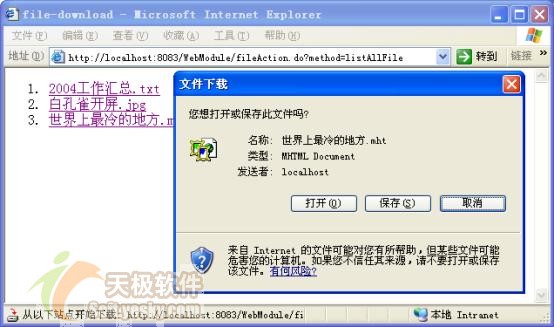 图 4 文件下载页面 |
该工程的资源结构如图 5所示:
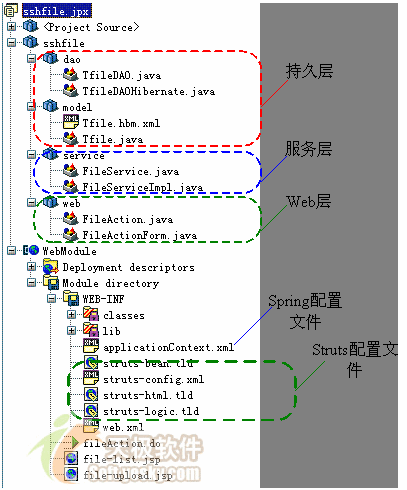 图 5 工程资源结构 |
工程的类按ssh的层次结构划分为数据持久层、业务层和web层;web-inf下的applicationcontext.xml为spring的配置文件,struts-config.xml为struts的配置文件,file-upload.jsp为文件上传页面,file-list.jsp为文件列表页面。
本文后面的章节将从数据持久层->业务层->web层的开发顺序,逐层讲解文件上传下载的开发过程。
数据持久层
1、领域对象及映射文件
您可以使用hibernate middlegen、hibernate tools、hibernate syhchronizer等工具或手工的方式,编写hibernate的领域对象和映射文件。其中对应t_file表的领域对象tfile.java为:
代码 1 领域对象tfile
| 1. package sshfile.model; 2. public class tfile 3.{ 4. private string fileid; 5. private string filename; 6. private byte[] filecontent; 7. private string remark; 8. …//getter and setter 9. } |
特别需要注意的是:数据库表为blob类型的字段在tfile中的filecontent类型为byte[]。tfile的hibernate映射文件tfile.hbm.xml放在tfile .java类文件的相同目录下:
代码 2 领域对象映射文件
| 1. <?xml version="1.0"?> 2. <!doctype hibernate-mapping public 3. "-//hibernate/hibernate mapping dtd 3.0//en" 4. "http://hibernate.sourceforge.net/hibernate-mapping-3.0.dtd" > 5. <hibernate-mapping> 6. <class name="sshfile.model.tfile" table="t_file"> 7. <id name="fileid" type="java.lang.string" column="file_id"> 8. <generator class="uuid.hex"/> 9. </id> 10. <property name="filecontent" 11. type="org.springframework.orm.hibernate3.support.blobbytearraytype" 12. column="file_content" lazy="true"/> 13. …//其它一般字段的映射 14. </class> 15. </hibernate-mapping> |
filecontent字段映射为spring所提供的blobbytearraytype类型,blobbytearraytype是用户自定义的数据类型,它实现了hibernate 的org.hibernate.usertype.usertype接口。blobbytearraytype使用从sessionfactory获取的lob操作句柄lobhandler将byte[]的数据保存到blob数据库字段中。这样,我们就再没有必要通过硬编码的方式,先insert然后再update来完成blob类型数据的持久化,这个原来难伺候的老爷终于被平民化了。关于lobhandler的配置请见本文后面的内容。
此外lazy="true"说明地返回整个tfile对象时,并不返回filecontent这个字段的数据,只有在显式调用tfile.getfilecontent()方法时才真正从数据库中获取filecontent的数据。这是hibernate3引入的新特性,对于包含重量级大数据的表字段,这种抽取方式提高了对大字段操作的灵活性,否则加载tfile对象的结果集时如果总是返回filecontent,这种批量的数据抽取将可以引起数据库的"洪泛效应"。
2、dao编写和配置
spring强调面向接口编程,所以我们将所有对tfile的数据操作的方法定义在tfiledao接口中,这些接口方法分别是:
?findbyfildid(string fileid)
?save(tfile tfile)
?list findall()
tfiledaohibernate提供了对tfiledao接口基于hibernate的实现,如代码 3所示:
代码 3 基于hibernate 的filedao实现类
| 1. package sshfile.dao; 2. 3. import sshfile.model.*; 4. import org.springframework.orm.hibernate3.support.hibernatedaosupport; 5. import java.util.list; 6. 7. public class tfiledaohibernate 8. extends hibernatedaosupport implements tfiledao 9. { 10. public tfile findbyfildid(string fileid) 11. { 12. return (tfile) gethibernatetemplate().get(tfile.class, fileid); 13. } 14. public void save(tfile tfile) 15. { 16. gethibernatetemplate().save(tfile); 17. gethibernatetemplate().flush(); 18. } 19. public list findall() 20. { 21. return gethibernatetemplate().loadall(tfile.class); 22. } 23. } |
tfiledaohibernate通过扩展spring提供的hibernate支持类hibernatedaosupport而建立,hibernatedaosupport封装了hibernatetemplate,而hibernatetemplate封装了hibernate所提供几乎所有的的数据操作方法,如execute(hibernatecallback action),load(class entityclass, serializable id),save(final object entity)等等。
所以我们的dao只需要简单地调用父类的hibernatetemplate就可以完成几乎所有的数据库操作了。
由于spring通过代理hibernate完成数据层的操作,所以原hibernate的配置文件hibernate.cfg.xml的信息也转移到spring的配置文件中:
代码 4 spring中有关hibernate的配置信息
| 1. <beans> 2. <!-- 数据源的配置 //--> 3. <bean id="datasource" class="org.apache.commons.dbcp.basicdatasource" 4. destroy-method="close"> 5. <property name="driverclassname" value="oracle.jdbc.driver.oracledriver"/> 6. <property name="url" value="jdbc:oracle:thin:@localhost:1521:ora9i"/> 7. <property name="username" value="test"/> 8. <property name="password" value="test"/> 9. </bean> 10. <!-- hibernate会话工厂配置 //--> 11. <bean id="sessionfactory" 12. class="org.springframework.orm.hibernate3.localsessionfactorybean"> 13. <property name="datasource" ref="datasource"/> 14. <property name="mappingdirectorylocations"> 15. <list> 16. <value>classpath:/sshfile/model</value> 17. </list> 18. </property> 19. <property name="hibernateproperties"> 20. <props> 21. <prop key="hibernate.dialect">org.hibernate.dialect.oracledialect</prop> 22. <prop key="hibernate.cglib.use_reflection_optimizer">true</prop> 23. </props> 24. </property> 25. </bean> 26. <!-- hibernate 模板//--> 27. <bean id="hibernatetemplate" 28. class="org.springframework.orm.hibernate3.hibernatetemplate"> 29. <property name="sessionfactory" ref="sessionfactory"/> 30. </bean> 31. <!--dao配置 //--> 32. <bean id="tfiledao" class="sshfile.dao.tfiledaohibernate"> 33. <property name="hibernatetemplate" ref="hibernatetemplate" /> 34. </bean> 35. … 36. </beans> |
第3~9行定义了一个数据源,其实现类是apache的basicdatasource,第11~25行定义了hibernate的会话工厂,会话工厂类用spring提供的localsessionfactorybean维护,它注入了数据源和资源映射文件,此外还通过一些键值对设置了hibernate所需的属性。
其中第16行通过类路径的映射方式,将sshfile.model类包目录下的所有领域对象的映射文件装载进来,在本文的例子里,它将装载进tfile.hbm.xml映射文件。如果有多个映射文件需要声明,使用类路径映射方式显然比直接单独指定映射文件名的方式要简便。
第27~30行定义了spring代理hibernate数据操作的hibernatetemplate模板,而第32~34行将该模板注入到tfiledao中。
需要指定的是spring 1.2.5提供了两套hibernate的支持包,其中hibernate 2相关的封装类位于org.springframework.orm.hibernate2.*包中,而hibernate 3.0的封装类位于org.springframework.orm.hibernate3.*包中,需要根据您所选用hibernate版本进行正确选择。
3、lob字段处理的配置
我们前面已经指出oracle的lob字段和一般类型的字段在操作上有一个明显的区别--那就是你必须首先通过oracle的empty_blob()/empty_clob()初始化lob字段,然后获取该字段的引用,通过这个引用更改其值。所以要完成对lob字段的操作,hibernate必须执行两步数据库访问操作,先insert再update。
使用blobbytearraytype字段类型后,为什么我们就可以象一般的字段类型一样操作blob字段呢?可以确定的一点是:blobbytearraytype不可能逾越blob天生的操作方式,原来是blobbytearraytype数据类型本身具体数据访问的功能,它通过lobhandler将两次数据访问的动作隐藏起来,使blob字段的操作在表现上和其他一般字段业类型无异,所以lobhandler即是那个"苦了我一个,幸福十亿人"的那位幕后英雄。
lobhandler必须注入到hibernate会话工厂sessionfactory中,因为sessionfactory负责产生与数据库交互的session。lobhandler的配置如代码 5所示:
代码 5 lob字段的处理句柄配置
| 1. <beans> 2. … 3. <bean id="nativejdbcextractor" 4. class="org.springframework.jdbc.support.nativejdbc.commonsdbcpnativejdbcextractor" 5. lazy-init="true"/> 6. <bean id="lobhandler" 7. class="org.springframework.jdbc.support.lob.oraclelobhandler" lazy-init="true"> 8. <property name="nativejdbcextractor"> 9. <ref local="nativejdbcextractor"/> 10. </property> 11. </bean> 12. … 13. </beans> |
首先,必须定义一个能够从连接池中抽取出本地数据库jdbc对象(如oracleconnection,oracleresultset等)的抽取器:nativejdbcextractor,这样才可以执行一些特定数据库的操作。对于那些仅封装了connection而未包括statement的简单数据连接池,simplenativejdbcextractor是效率最高的抽取器实现类,但具体到apache的basicdatasource连接池,它封装了所有jdbc的对象,这时就需要使用commonsdbcpnativejdbcextractor了。spring针对几个著名的web服务器的数据源提供了相应的jdbc抽取器:
?weblogic:weblogicnativejdbcextractor
?websphere:webspherenativejdbcextractor
?jboss:jbossnativejdbcextractor
在定义了jdbc抽取器后,再定义lobhandler。spring 1.2.5提供了两个lobhandler:
?defaultlobhandler:适用于大部分的数据库,如sqlserver,mysql,对oracle 10g也适用,但不适用于oracle 9i(看来oracle 9i确实是个怪胎,谁叫oracle 公司自己都说oracle 9i是一个过渡性的产品呢)。
?oraclelobhandler:适用于oracle 9i和oracle 10g。
由于我们的数据库是oracle9i,所以使用oraclelobhandler。
在配置完lobhandler后, 还需要将其注入到sessionfactory的bean中,下面是调用后的sessionfactory bean的配置:
代码 6 将lobhandler注入到sessionfactory中的配置
| 1. <beans> 2. … 3. <bean id="sessionfactory" 4. class="org.springframework.orm.hibernate3.localsessionfactorybean"> 5. <property name="datasource" ref="datasource"/> 6. <!-- 为处理blob类型字段的句柄声明 //--> 7. <property name="lobhandler" ref="lobhandler"/> 8. … 9. </bean> 10. … 11. </beans> |
如第7所示,通过sessionfactory的lobhandler属性进行注入。
业务层
1、业务层接口
"面向接口而非面向类编程"是spring不遗余力所推荐的编程原则,这条原则也已经为大部开发者所接受;此外,jdk的动态代理只对接口有效,否则必须使用cglib生成目标类的子类。我们依从于spring的倡导为业务类定义一个接口:
代码 7 业务层操作接口
| 1. public interface fileservice 2. { 3. void save(fileactionform fileform);//将提交的上传文件保存到数据表中 4. list getallfile();//得到t_file所示记录 5. void write(outputstream os,string fileid);//将某个文件的文件数据写出到输出流中 6. string getfilename(string fileid);//获取文件名 7. } |
其中save(fileactionform fileform)方法,将封装在fileform中的上传文件保存到数据库中,这里我们使用fileactionform作为方法入参,fileactionform是web层的表单数据对象,它封装了提交表单的数据。将fileactionform直接作为业务层的接口入参,相当于将web层传播到业务层中去,即将业务层绑定在特定的web层实现技术中,按照分层模型学院派的观点,这是一种反模块化的设计,但在"一般"的业务系统并无需提供多种ui界面,系统web层将来切换到另一种实现技术的可能性也微乎其微,所以笔者觉得没有必要为了这个业务层完全独立于调用层的过高目标而去搞一个额外的隔离层,浪费了原材料不说,还将系统搞得过于复杂,相比于其它原则,"简单"始终是最大的一条原则。
getallfile()负责获取t_file表所有记录,以便在网页上显示出来。
而getfilename(string fileid)和write(outputstream os,string fileid)则用于下载某个特定的文件。具体的调用是将web层将response.getoutputstream()传给write(outputstream os,string fileid)接口,业务层直接将文件数据输出到这个响应流中。具体实现请参见错误!未找到引用源。节下载文件部分。
2、业务层接口实现类
fileservice的实现类为fileserviceimpl,其中save(fileactionform fileform)的实现如下所示:
代码 8 业务接口实现类之save()
| 1. … 2. public class fileserviceimpl 3. implements fileservice 4. { 5. private tfiledao tfiledao; 6. public void save(fileactionform fileform) 7. { 8. tfile tfile = new tfile(); 9. try 10. { 11. tfile.setfilecontent(fileform.getfilecontent().getfiledata()); 12. } 13. catch (filenotfoundexception ex) 14. { 15. throw new runtimeexception(ex); 16. } 17. catch (ioexception ex) 18. { 19. throw new runtimeexception(ex); 20. } 21. tfile.setfilename(fileform.getfilecontent().getfilename()); 22. tfile.setremark(fileform.getremark()); 23. tfiledao.save(tfile); 24. } 25. … 26. } |
在save(fileactionform fileform)方法里,完成两个步骤:
其一,象在水桶间倒水一样,将fileactionform对象中的数据倒入到tfile对象中;
其二,调用tfiledao保存数据。
需要特别注意的是代码的第11行,fileactionform的filecontent属性为org.apache.struts.upload.formfile类型,formfile提供了一个方便的方法getfiledata(),即可获取文件的二进制数据。通过解读formfile接口实现类diskfile的原码,我们可能知道formfile本身并不缓存文件的数据,只有实际调用getfiledata()时,才从磁盘文件输入流中获取数据。由于formfile使用流读取方式获取数据,本身没有缓存文件的所有数据,所以对于上传超大体积的文件,也是没有问题的;但是,由于数据持久层的tfile使用byte[]来缓存文件的数据,所以并不适合处理超大体积的文件(如100m),对于超大体积的文件,依然需要使用java.sql.blob类型以常规流操作的方式来处理。
此外,通过fileform的getfilename()方法就可以获得上传文件的文件名,如第21行代码所示。
write(outputstream os,string fileid)方法的实现,如代码 9所示:
代码 9 业务接口实现类之write()
| 1. … 2. public class fileserviceimpl 3. implements fileservice 4. { 5. 6. public void write(outputstream os, string fileid) 7. { 8. tfile tfile = tfiledao.findbyfildid(fileid); 9. try 10. { 11. os.write(tfile.getfilecontent()); 12. os.flush(); 13. } 14. catch (ioexception ex) 15. { 16. throw new runtimeexception(ex); 17. } 18. } 19. … 20. } |
write(outputstream os,string fileid)也简单地分为两个操作步骤,首先,根据fileid加载表记录,然后将filecontent写入到输出流中。
3、spring事务配置
下面,我们来看如何在spring配置文件中为fileservice配置声明性的事务
| 1. <beans> 2. … 3. <bean id="transactionmanager" 4. class="org.springframework.orm.hibernate3.hibernatetransactionmanager"> 5. <property name="sessionfactory" ref="sessionfactory"/> 6. </bean> 7. <!-- 事务处理的aop配置 //--> 8. <bean id="txproxytemplate" abstract="true" 9. class="org.springframework.transaction.interceptor.transactionproxyfactorybean"> 10. <property name="transactionmanager" ref="transactionmanager"/> 11. <property name="transactionattributes"> 12. <props> 13. <prop key="get*">propagation_required,readonly</prop> 14. <prop key="find*">propagation_required,readonly</prop> 15. <prop key="save">propagation_required</prop> 16. <prop key="write">propagation_required,readonly</prop> 17. </props> 18. </property> 19. </bean> 20. <bean id="fileservice" parent="txproxytemplate"> 21. <property name="target"> 22. <bean class="sshfile.service.fileserviceimpl"> 23. <property name="tfiledao" ref="tfiledao"/> 24. </bean> 25. </property> 26. </bean> 27. </beans> |
spring的事务配置包括两个部分:
其一,定义事务管理器transactionmanager,使用hibernatetransactionmanager实现事务管理;
其二,对各个业务接口进行定义,其实txproxytemplate和fileservice是父子节点的关系,本来可以将txproxytemplate定义的内容合并到fileservice中一起定义,由于我们的系统仅有一个业务接口需要定义,所以将其定义的一部分抽象到父节点txproxytemplate中意义确实不大,但是对于真实的系统,往往拥有为数众多的业务接口需要定义,将这些业务接口定义内容的共同部分抽取到一个父节点中,然后在子节点中通过parent进行关联,就可以大大简化业务接口的配置了。
父节点txproxytemplate注入了事务管理器,此外还定义了业务接口事务管理的方法(允许通过通配符的方式进行匹配声明,如前两个接口方法),有些接口方法仅对数据进行读操作,而另一些接口方法需要涉及到数据的更改。对于前者,可以通过readonly标识出来,这样有利于操作性能的提高,需要注意的是由于父类节点定义的bean仅是子节点配置信息的抽象,并不能具体实现化一个bean对象,所以需要特别标注为abstract="true",如第8行所示。
fileservice作为一个目标类被注入到事务代理器中,而fileservice实现类所需要的tfiledao实例,通过引用3.2节中定义的tfiledao bean注入。
web层实现
1、web层的构件和交互流程
web层包括主要3个功能:
?上传文件。
?列出所有已经上传的文件列表,以供点击下载。
?下载文件。
web层实现构件包括与2个jsp页面,1个actionform及一个action:
?file-upload.jsp:上传文件的页面。
?file-list.jsp:已经上传文件的列表页面。
?fileactionform:file-upload.jsp页面表单对应的actionform。
?fileaction:继承org.apache.struts.actions.dispatchaction的action,这样这个action就可以通过一个url参数区分中响应不同的请求。
web层的这些构件的交互流程如图 6所示:
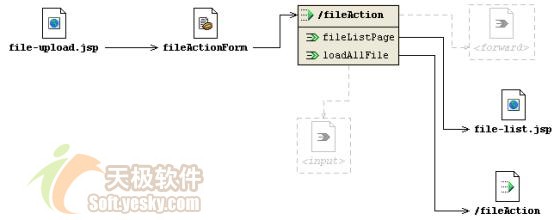 图 6 web层struts流程图 |
其中,在执行文件上传的请求时,fileaction在执行文件上传后,forward到loadallfile出口中,loadallfile加载数据库中所有已经上传的记录,然后forward到名为filelistpage的出口中,调用file-list.jsp页面显示已经上传的记录。
2、fileaction功能
struts 1.0的action有一个弱项:一个action只能处理一种请求,struts 1.1中引入了一个dispatchaction,允许通过url参数指定调用action中的某个方法,如http://yourwebsite/fileaction.do?method=upload即调用fileaction中的upload方法。通过这种方式,我们就可以将一些相关的请求集中到一个action当中编写,而没有必要为某个请求操作编写一个action类。但是参数名是要在struts-config.xml中配置的:
| 1. <struts-config> 2. <form-beans> 3. <form-bean name="fileactionform" type="sshfile.web.fileactionform" /> 4. </form-beans> 5. <action-mappings> 6. <action name="fileactionform" parameter="method" path="/fileaction" 7. type="sshfile.web.fileaction"> 8. <forward name="filelistpage" path="/file-list.jsp" /> 9. <forward name="loadallfile" path="/fileaction.do?method=listallfile" /> 10. </action> 11. </action-mappings> 12. </struts-config> |
第6行的parameter="method"指定了承载方法名的参数,第9行中,我们还配置了一个调用fileaction不同方法的action出口。
fileaction共有3个请求响应的方法,它们分别是:
?upload(…):处理上传文件的请求。
?listallfile(…):处理加载数据库表中所有记录的请求。
?download(…):处理下载文件的请求。
下面我们分别对这3个请求处理方法进行讲解。
2.1 上传文件
上传文件的请求处理方法非常简单,简之言之,就是从spring容器中获取业务层处理类fileservice,调用其save(fileactionform form)方法上传文件,如下所示:
| 1. public class fileaction 2. extends dispatchaction 3. { 4. //将上传文件保存到数据库中 5. public actionforward upload(actionmapping mapping, actionform form, 6. httpservletrequest request, 7. httpservletresponse response) 8. { 9. fileactionform fileform = (fileactionform) form; 10. fileservice fileservice = getfileservice(); 11. fileservice.save(fileform); 12. return mapping.findforward("loadallfile"); 13. } 14. //从spring容器中获取fileservice对象 15. private fileservice getfileservice() 16. { 17. applicationcontext appcontext = webapplicationcontextutils. 18. getwebapplicationcontext(this.getservlet().getservletcontext()); 19. return (fileservice) appcontext.getbean("fileservice"); 20. } 21. … 22. } |
由于fileaction其它两个请求处理方法也需要从spring容器中获取fileservice实例,所以我们特别提供了一个getfileservice()方法(第15~21行)。重构的一条原则就是:"发现代码中有重复的表达式,将其提取为一个变量;发现类中有重复的代码段,将其提取为一个方法;发现不同类中有相同的方法,将其提取为一个类"。在真实的系统中,往往拥有多个action和多个service类,这时一个比较好的设置思路是,提供一个获取所有service实现对象的工具类,这样就可以将spring 的service配置信息屏蔽在一个类中,否则service的配置名字散落在程序各处,维护性是很差的。
2.2 列出所有已经上传的文件
listallfile方法调用servie层方法加载t_file表中所有记录,并将其保存在request域中,然后forward到列表页面中:
| 1. public class fileaction 2. extends dispatchaction 3. { 4. … 5. public actionforward listallfile(actionmapping mapping, actionform form, 6. httpservletrequest request, 7. httpservletresponse response) 8. throws moduleexception 9. { 10. fileservice fileservice = getfileservice(); 11. list filelist = fileservice.getallfile(); 12. request.setattribute("filelist",filelist); 13. return mapping.findforward("filelistpage"); 14. } 15. } |
file-list.jsp页面使用struts标签展示出保存在request域中的记录:
| 1. <%@page contenttype="text/html; charset=gbk"%> 2. <%@taglib uri="/web-inf/struts-logic.tld" prefix="logic"%> 3. <%@taglib uri="/web-inf/struts-bean.tld" prefix="bean"%> 4. <html> 5. <head> 6. <title>file-download</title> 7. </head> 8. <body bgcolor="#ffffff"> 9. <ol> 10. <logic:iterate id="item" name="filelist" scope="request"> 11. <li> 12. <a href='fileaction.do?method=download&fileid= 13. <bean:write name="item"property="fileid"/>'> 14. <bean:write name="item" property="filename"/> 15. </a> 16. </li> 17. </logic:iterate> 18. </ol> 19. </body> 20. </html> |
展现页面的每条记录挂接着一个链接地址,形如:fileaction.do?method=download&fileid=xxx,method参数指定了这个请求由fileaction的download方法来响应,fileid指定了记录的主键。
由于在fileactionform中,我们定义了fileid的属性,所以在download响应方法中,我们将可以从fileactionform中取得fileid的值。这里涉及到一个处理多个请求action所对应的actionform的设计问题,由于原来的action只能对应一个请求,那么原来的actionform非常简单,它仅需要将这个请求的参数项作为其属性就可以了,但现在一个action对应多个请求,每个请求所对应的参数项是不一样的,此时的actionform的属性就必须是多请求参数项的并集了。所以,除了文件上传请求所对应的filecontent和remark属性外还包括文件下载的fileid属性:
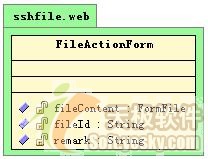 图 7 fileactionform |
当然这样会造成属性的冗余,比如在文件上传的请求中,只会用到filecontent和remark属性,而在文件下载的请求时,只会使用到fileid属性。但这种冗余是会带来好处的--它使得一个action可以处理多个请求。
2.3 下载文件
在列表页面中点击一个文件下载,其请求由fileaction的download方法来响应,download方法调用业务层的fileservice方法,获取文件数据并写出到response的响应流中。通过合理设置http响应头参数,将响应流在客户端表现为一个下载文件对话框,其代码如下所示:
代码 10 业务接口实现类之download
| 1. public class fileaction 2. extends dispatchaction 3. { 4. … 5. public actionforward download(actionmapping mapping, actionform form, 6. httpservletrequest request, 7. httpservletresponse response) 8. throws moduleexception 9. { 10. fileactionform fileform = (fileactionform) form; 11. fileservice fileservice = getfileservice(); 12. string filename = fileservice.getfilename(fileform.getfileid()); 13. try 14. { 15. response.setcontenttype("application/x-msdownload"); 16. response.setheader("content-disposition", 17. "attachment;" + " filename="+ 18. new string(filename.getbytes(), "iso-8859-1")); 19. fileservice.write(response.getoutputstream(), fileform.getfileid()); 20. } 21. catch (exception e) 22. { 23. throw new moduleexception(e.getmessage()); 24. } 25. return null; 26. } 27. } |
第15~18行,设置http响应头,将响应类型设置为application/x-msdownload mime类型,则响应流在ie中将弹出一个文件下载的对话框,如图 4所示。ie所支持的mime类型多达26种,您可以通过这个网址查看其他的mime类型:
http://msdn.microsoft.com/workshop/networking/moniker/overview/appendix_a.asp。
如果下载文件的文件名含有中文字符,如果不对其进行硬编码,如第18行所示,客户文件下载对话框中出现的文件名将会发生乱码。
第19行代码获得response的输出流,作为fileservie write(outputstream os,string fileid)的入参,这样文件的内容将写到response的输出流中。
3、web.xml文件的配置
spring容器在何时启动呢?我可以在web容器初始化来执行启动spring容器的操作,spring提供了两种方式启动的方法:
?通过org.springframework.web.context .contextloaderlistener容器监听器,在web容器初始化时触发初始化spring容器,在web.xml中通过<listener></listener>对其进行配置。
?通过servlet org.springframework.web.context.contextloaderservlet,将其配置为自动启动的servlet,在web容器初始化时,通过这个servlet启动spring容器。
在初始化spring容器之前,必须先初始化log4j的引擎,spring也提供了容器监听器和自动启动servlet两种方式对log4j引擎进行初始化:
?org.springframework.web.util .log4jconfiglistener
?org.springframework.web.util.log4jconfigservlet
下面我们来说明如何配置web.xml启动spring容器:
代码 11 web.xml中对应spring的配置内容
| 1. <web-app> 2. <context-param> 3. <param-name>contextconfiglocation</param-name> 4. <param-value>/web-inf/applicationcontext.xml</param-value> 5. </context-param> 6. <context-param> 7. <param-name>log4jconfiglocation</param-name> 8. <param-value>/web-inf/log4j.properties</param-value> 9. </context-param> 10. <servlet> 11. <servlet-name>log4jinitservlet</servlet-name> 12. <servlet-class>org.springframework.web.util.log4jconfigservlet</servlet-class> 13. <load-on-startup>1</load-on-startup> 14. </servlet> 15. <servlet> 16. <servlet-name>springinitservlet</servlet-name> 17. <servlet-class>org.springframework.web.context.contextloaderservlet</servlet-class> 18. <load-on-startup>2</load-on-startup> 19. </servlet> 20. … 21. </web-app> |
启动spring容器时,需要得到两个信息:spring配置文件的地址和log4j属性文件,这两上信息分别通过contextconfiglocationweb和log4jconfiglocation容器参数指定,如果有多个spring配置文件,则用逗号隔开,如:
/web-inf/applicationcontext_1.xml, /web-inf/applicationcontext_1.xm2
由于在启动contextloaderservlet之前,必须事先初始化log4j的引擎,所以log4jconfigservlet必须在contextloaderservlet之前启动,这通过<load-on-startup>来指定它们启动的先后顺序。
乱码是开发web应用程序一个比较老套又常见问题,由于不同web应用服务器的默认编码是不一样的,为了方便web应用在不同的web应用服务器上移植,最好的做法是web程序自身来处理编码转换的工作。经典的作法是在web.xml中配置一个编码转换过滤器,spring就提供了一个编码过滤器类characterencodingfilter,下面,我们为应用配置上这个过滤器:
| 1. <web-app> 2. … 3. <filter> 4. <filter-name>encodingfilter</filter-name> 5. <filter-class>org.springframework.web.filter.characterencodingfilter</filter-class> 6. <init-param> 7. <param-name>encoding</param-name> 8. <param-value>gbk</param-value> 9. </init-param> 10. </filter> 11. <filter-mapping> 12. <filter-name>encodingfilter</filter-name> 13. <url-pattern>/*</url-pattern> 14. </filter-mapping> 15. … 16. </web-app> |
spring的过滤器类是org.springframework.web.filter.characterencodingfilter,通过encoding参数指定编码转换类型为gbk,<filter-mapping>的配置使该过滤器截获所有的请示。
struts的框架也需要在web.xml中配置,想必读者朋友对struts的配置都很熟悉,故在此不再提及,请参见本文所提供的源码。
总结
本文通过一个文件上传下载的web应用,讲解了如何构建基于ssh的web应用,通过struts和formfile,spring的lobhandler以及spring为hibernateblob处理所提供的用户类blobbytearraytype ,实现上传和下载文件的功能仅需要廖廖数行的代码即告完成。读者只需对程序作稍许的调整,即可处理clob字段:
?领域对象对应clob字段的属性声明为string类型;
?映射文件对应clob字段的属性声明为org.springframework.orm.hibernate3.support.clobstringtype类型。
本文通过ssh对文件上传下载简捷完美的实现得以管中窥豹了解ssh强强联合构建web应用的强大优势。在行文中,还穿插了一些分层的设计经验,配置技巧和spring所提供的方便类,相信这些知识对您的开发都有所裨益。

 闽公网安备 35060202000074号