1. 环境说明
安装eclipse和安装myeclipse组件的过程在这里不进行介绍。可以参考其它资料完成eclipse环境的安装与资源的配置。
接下来的篇幅将给出一个在myeclipse开发环境下的一个web工程实例。说明在myeclipse的集成开发环境下,如何利用struts进行web工程开发。
例子工程的环境:
windows 2000 professional或者更高的版本。
j2sdk 5.0
apache tomcat 5.0
mysql 4.0.14b
eclipse-sdk-3.1
myeclipse 4.0
sqlyog407(可选)
2. 例子工程说明
本例子是利用struts架构,实现用户logon的web工程。在这个工程中,用户可以访问三个页面,index.jsp、logon.jsp、menu.jsp。他们的关系如下图所示:
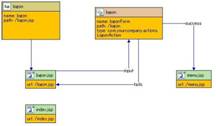
其中,左上角的方框代表struts结构中/web-inf/struts-config.xml中定义的,<global-forwards>,也就是在整个web工程中,只要有logon的动作发生,都会使画面转移到logon.jsp。那么处理logon.jsp画面的formbeen是上图上放右侧的模块表示的formbean来完成――logonform。
logonfrom处理后会有两个结果,“success”的时候,画面会转移到menu.jsp,失败的话,回到logon画面。
在logon画面,用户需要输入用户名和密码,点击submit,进行登录认证。输入内容的检测是在logonform的bean中检查。判断操作在logonaction的bean中完成,在logonaction的bean中,需要访问mysql数据库的account表格,进行用户和密码的查询。查询成功的话,证明用户认证通过。
3. 建立工程
3.1 v创建新的web project
启动myeclipse,通过wizard,建立一个web工程。如下图:
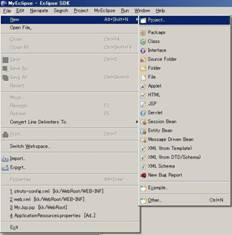
点击project后,myeclipse弹出工程的对话框,我们在所罗列的工程中选中myeclipse下面的j2ee projects的web project。如下图所示:
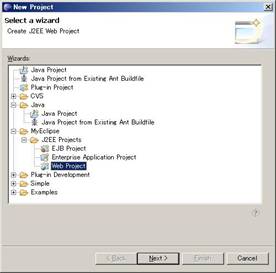
在wizard的下一页,必要的输入信息是project name、context root url。最后点击finish,一个空的webproject就已经建立起来了
3.2 加载struts
在新创建的web project中加载struts。
在myeclipse集成开发环境下,已经集成了struts开发的环境,用户可以根据自己的实际需要,加载struts的环境。加载过程如下图:
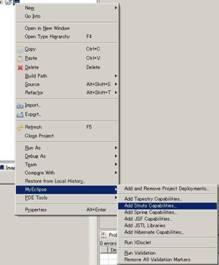
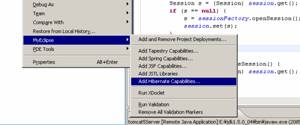
右键点击刚刚创建好的工程,点击myeclipse属性,在扩展的右键菜单里面,选择add struts capabilities。
myeclipse集成环境就会自动将struts所需要的目录结构进行创建,并将需要的环境资源自动引用到相应的目录中去。
我们还要对自动生成的struts进行修正,首先,修改web-inf/web.xml 将<web-app>标签中的属性删除。<web-app xxxxxxxxxxxxxxx> -> <web-app>
其次要添加本工程的标签定义库,添加<taglib></taglib>
<taglib>
<taglib-uri>/web-inf/app.tld</taglib-uri>
<taglib-location>/web-inf/app.tld</taglib-location>
</taglib>
<taglib>
<taglib-uri>/web-inf/struts-bean.tld</taglib-uri>
<taglib-location>/web-inf/struts-bean.tld
</taglib-location>
</taglib>
<taglib>
<taglib-uri>/web-inf/struts-html.tld</taglib-uri>
<taglib-location>/web-inf/struts-html.tld
</taglib-location>
</taglib>
<taglib>
<taglib-uri>/web-inf/struts-logic.tld</taglib-uri>
<taglib-location>/web-inf/struts-logic.tld
</taglib-location>
</taglib>
4. 完善工程
4.1 添加index画面
在加载完struts结构之后,就可以在这个工程中添加内容了。我们可以添加一个画面jsp。添加jsp很简单,点击工程的右键,添加jsp。wizard会弹出一个添加的对话框。如下图:
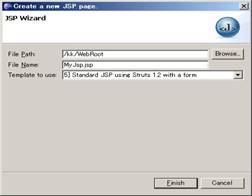
在file name栏中改变文件名称,改成index.jsp把这个jsp作为web工程的第一个画面。
template to use 栏可以选择第五项(选择选择其他项也可以)。
对于新生成的jsp文件进行必要的修改。
index.jsp文件:
<taglib>
<%@ page language="java" pageencoding="utf-8"%>
<%@ taglib uri="/web-inf/struts-bean.tld" prefix="bean" %>
<%@ taglib uri="/web-inf/struts-html.tld" prefix="html" %>
<%@ taglib uri="/web-inf/struts-logic.tld" prefix="logic" %>
<!doctype html public "-//w3c//dtd html 4.01 transitional//en">
<html>
<head>
<title>my jsp 'index.jsp' starting page</title>
<meta http-equiv="pragma" content="no-cache">
<meta http-equiv="cache-control" content="no-cache">
<meta http-equiv="expires" content="0">
<meta http-equiv="keywords" content="
keyword1,keyword2,keyword3">
<meta http-equiv="description" content="this is my page">
<!--
<link rel="stylesheet" type="text/css" href="styles.css">
-->
</head>
<body>
<h3><bean:message key="index.heading"/></h3>
<html:link page="/logon.jsp"><bean:message key="index.logon"/></html:link>
</body>
</html>
其中蓝色和橙色部分是修改的内容,蓝色部分是今后自动添加jsp文件必须修改的地方,让这个页面用到的tag都能在这个工程中定义的tag集合中找到。
橙色部分是画面的主要显示内容。<h3></h3>的内容是一段文本,内容被struts结构的静态文本集合中的index.heading给替换掉了。这个文本的内容可以在工程的src/com/yourcompany/struts/applicationresources.properties文件中找到。struts结构推荐用户将页面上的静态文本用applicationresources的形式替换。这样可以在大量的维护页面文字时候,感到便捷很多,同时,也大大减轻了多国语言版本网页的维护。
<html:link page="/logon.jsp">相当于html语言中的<a herf=xxxxx>。这个tag是在/web-inf/struts-html.tld中可以找到并在显示页面的时候,被转义成<a herf=xxxxx>
4.2 添加logon画面
添加方法跟添加index画面相同。修改内容稍微有些差别。
logon.jsp的内容:
<taglib>
<%@ page language="java" pageencoding="utf-8"%>
<%@ taglib uri="/web-inf/struts-bean.tld" prefix="bean" %>
<%@ taglib uri="/web-inf/struts-html.tld" prefix="html" %>
<%@ taglib uri="/web-inf/struts-logic.tld" prefix="logic" %>
<!doctype html public "-//w3c//dtd html 4.01 transitional//en">
<html:html locale="true">
<head>
<html:base />
<title>logon.jsp</title>
<meta http-equiv="pragma" content="no-cache">
<meta http-equiv="cache-control" content="no-cache">
<meta http-equiv="expires" content="0">
<meta http-equiv="keywords"
content="keyword1,keyword2,keyword3">
<meta http-equiv="description" content="this is my page">
</head>
<body>
<html:form action="/logon.do" method="post" focus="username">
<table border="0">
<tr>
<td><bean:message key="prompt.username"/></td>
<td><html:text property="username" /></td>
</tr>
<tr>
<td>password:</td>
<td><html:password property="password" /></td>
</tr>
<tr>
<td colspan="2" align="center"><html:submit /></td>
</tr>
</table>
</html:form>
</body>
</html:html>
其中,蓝色部分是引用本工程的tag标示库,红色的部分是表单属性名称的修改,和指定action动作的名称。
4.3 修改web-inf/struts-config.xml
画面上出现了form,那么根据struts的结构要求,就必须在web-inf/struts-config.xml中明确这个form的formbean(表单内容校验的java class)是什么。执行这个form的action(表单执行的内部逻辑)是什么,以及action的结果会产生怎样的画面迁移。这些都是在web-inf/struts-config.xml中定义的。也就是标准的mvc架构所要求的。
<taglib>
<struts-config>
<form-beans >
<form-bean name="logonform" type="com.yourcompany.forms.
logonform" />
</form-beans>
<global-forwards >
<forward name="logon" path="/logon.jsp" />
</global-forwards>
<action-mappings >
<action
path="/logon"
type="com.yourcompany.actions.logonaction"
name="logonform"
scope="request"
input="/logon.jsp">
<forward name="success" path="/menu.jsp" />
<forward name="fails" path="/logon.jsp" />
</action>
</action-mappings>
<message-resources parameter="com.yourcompany.struts.
applicationresources" />
</struts-config>
其中<action>部分是说明action的属性。
path 指定action处理的url
type 指定action的类名
name 指定action主力的actionform名,与<form-beans >元素的name属性匹配。
scope 指定actionform存在的范围
input 指定包含客户提交表单的网页,如果actionform的validate方法返回错误,则因该把用户请求转发到这个网页。
validate 如果取值为true,则表示actionservlet应该调用actionform的validate方法
forward 就是action的execute方法执行完毕后,把客户请求在转发给相应的页面。
4.4 添加formbean和actionbean
添加方法跟jsp相同,但是在选择superclass的时候,formbean要选择actionform作为类的父类。actionbean的父类是action
下面是各自的代码
logonform.java文件内容:
<taglib>
package com.yourcompany.forms;
import javax.servlet.http.httpservletrequest;
import org.apache.struts.action.actionform;
import org.apache.struts.action.actionmapping;
public class logonform extends actionform {
private static final long serialversionuid
= 7322786881443789688l;
// ------------------------------
--------------------------- instance variables
private string username = null;
private string password = null;
// -------------------------
-------------------------------- methods
public string getusername() {
return (this.username);
}
public void setusername(string username) {
this.username = username;
}
public string getpassword() {
return (this.password);
}
public void setpassword(string password) {
this.password = password;
}
public void reset(actionmapping mapping,
httpservletrequest request) {
this.password = null;
this.username = null;
}
}
logonaction.java文件:
package com.yourcompany.actions;
import javax.servlet.http.httpservletrequest;
import javax.servlet.http.httpservletresponse;
import org.apache.struts.action.action;
import org.apache.struts.action.actionform;
import org.apache.struts.action.actionforward;
import org.apache.struts.action.actionmapping;
import com.yourcompany.forms.logonform;
public class logonaction extends action {
public actionforward execute(actionmapping
mapping, actionform form,
httpservletrequest request,
httpservletresponse response) {
string username = null;
string password = null;
if (form != null) {
username = ((logonform) form).getusername();
password = ((logonform) form).getpassword();
}
if(username.equals(“test1”) && password.
equals(“test1”)){
return (mapping.findforward("success"));
}
else{
return (mapping.findforward("fails"));
}
}
}
4.5 添加menu画面
与添加index画面的方法相同。下面是menu.jsp文件的内容
<taglib>
<%@ page language="java" pageencoding="utf-8"%>
<%@ taglib uri="/web-inf/struts-bean.tld" prefix="bean" %>
<%@ taglib uri="/web-inf/struts-html.tld" prefix="html" %>
<%@ taglib uri="/web-inf/struts-logic.tld" prefix="logic" %>
<!doctype html public "-//w3c//dtd html 4.01 transitional//en">
<html:html locale="true">
<head>
<html:base />
<title>menu.jsp</title>
<meta http-equiv="pragma" content="no-cache">
<meta http-equiv="cache-control" content="no-cache">
<meta http-equiv="expires" content="0">
<meta http-equiv="keywords" content="keyword1,keyword2,keyword3">
<meta http-equiv="description" content="this is my page">
</head>
<body>
<h3><bean:message key="menu.message"/></h3>
</body>
</html:html>
5. 调试工程
如果本地机器已经安装了tomcat5,那么可以在myeclilpse的环境下调试工程了。
指定tomcat5 的web application service 如下图:
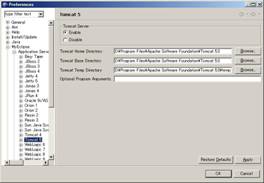
将enable选项打开,并且指定tomcat的安装目录。
配置目前的工程到tomcat中去。

点选工具栏上的被红线圈出的按钮
在弹出来的对话框中选择,我们创建的工程,和添加tomcat5 的web application service
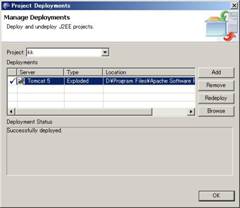
然后就可以按下工具栏上的启动服务按钮,调试这个web工程了。

每一次改动工程中的文件后,要想看看改动后的效果,那么就在配置工程中,重新发布这个工程到tomecat5去。
6. tomcat下如何配置mysql的数据库连接池
6.1 配置server.xml
配置tomcat的server.xml文件,路径:【tomcat_home】/common/lib下的server.xml文件在</host>之前加入以下内容以添加jndi数据源:
<taglib>
<context path="/dbtest" docbase="dbtest"
debug="5" reloadable="true" crosscontext="true">
<logger classname="org.apache.catalina.logger.filelogger"
prefix="localhost_dbtest_log." suffix=".txt"
timestamp="true"/>
<resource name="jdbc/testdb"
auth="container"
type="javax.sql.datasource"/>
<resourceparams name="jdbc/testdb">
<parameter>
<name>factory</name>
<value>org.apache.commons.dbcp.basicdatasourcefactory</value>
</parameter>
<!-- maximum number of db connections in pool. make sure you
configure your mysqld max_connections large enough to handle
all of your db connections. set to 0 for no limit.
-->
<parameter>
<name>maxactive</name>
<value>100</value>
</parameter>
<!-- maximum number of idle db connections to retain in pool.
set to 0 for no limit.
-->
<parameter>
<name>maxidle</name>
<value>30</value>
</parameter>
<!-- maximum time to wait for a db connection to become available
in ms, in this example 10 seconds. an exception is thrown if
this timeout is exceeded. set to -1 to wait indefinitely.
-->
<parameter>
<name>maxwait</name>
<value>10000</value>
</parameter>
<!-- mysql db username and password for db connections -->
<parameter>
<name>username</name>
<value>root</value>
</parameter>
<parameter>
<name>password</name>
<value> </value>
</parameter>
<!-- class name for mm.mysql jdbc driver -->
<parameter>
<name>driverclassname</name>
<value>org.gjt.mm.mysql.driver</value>
</parameter>
<!-- the jdbc connection url for connecting to your mysql db.
the autoreconnect=true argument to the url makes sure that the
mm.mysql jdbc driver will automatically reconnect if mysqld closed the
connection. mysqld by default closes idle connections after 8 hours.
-->
<parameter>
<name>url</name> <value>jdbc:mysql://192.168.0.208:3306
/db_test_account?autoreconnect=true</value>
</parameter>
</resourceparams>
</context>
注意:
*其中蓝色字体表示你这个应用的路径和别名,也就是你访问自己配置的这个web站点的名字,注意区分大小写,必须一致,否则系统无法正常运行(例:http://localhost:8080/dbtest)
*其中红色字体表示数据源的名字,注意将会被web.xml和你访问数据库的程序调用
6.2 配置web.xml
配置web用程序的web.xml文件
<taglib>
<?xml version="1.0" encoding="iso-8859-1"?>
<!doctype web-app public
"-//sun microsystems, inc.//dtd web application 2.3//en"
"http://java.sun.com/dtd/web-app_2_3.dtd">
<web-app>
<description>mysql test app</description>
<resource-ref>
<description>db connection</description>
<res-ref-name>jdbc/testdb</res-ref-name>
<res-type>javax.sql.datasource</res-type>
<res-auth>container</res-auth>
</resource-ref>
</web-app>
6.3 访问数据库的程序片段
<taglib>
package swt.db.dbutility;
import javax.naming.*;
import javax.sql.*;
import java.sql.*;
public class dbtest {
string foo = "not connected";
int bar = -1;
public void init() {
try{
context ctx = new initialcontext();
if(ctx == null )
throw new exception("boom - no context");
datasource ds =
(datasource)ctx.lookup(
"java:comp/env/jdbc/testdb");
if (ds != null) {
connection conn = ds.getconnection();
if(conn != null) {
foo = "got connection "+conn.tostring();
statement stmt = conn.createstatement();
resultset rst =
stmt.executequery(
" select username from t_account ");
if(rst.next()) {
foo=rst.getstring(1);
bar=208;
}
conn.close();
}
}
}catch(exception e) {
e.printstacktrace();
}
}
public string getfoo() { return foo; }
public int getbar() { return bar;}
}
6.4 jsp页面(index.jsp)
<taglib>
<%@ page language="java" pageencoding="utf-8"%>
<%@ page import ="swt.db.dbutility.*" %>
<html>
<head>
<title>db test</title>
</head>
<body>
<%
dbtest tst = new dbtest();
tst.init();
%>
<h2>results</h2>
foo <%= tst.getfoo() %><br>
bar <%= tst.getbar() %>
</body>
</html>
启动tomcat在浏览器上输入http://localhost:8080/dbtest
备注:
连接池配置(database connection pool (dbcp) configurations)
dbcp使用的是jakarta-commons database connection pool 要使用连接池需要如下的组件即jar文件
jakarta-commons dbcp 1.1 对应commons-dbcp-1.1.jar。
jakarta-commons collections 2.0 对应commons-collections.jar。
jakarta-commons pool 1.1 对应commons-pool-1.1.jar。
这三个jar文件要与你的jdbc驱动程序一起放到【tomcat_home】/common/lib目录下以便让tomcat和你的web应用都能够找到。
7.1 在tomcat下建立数据库连接池,如6中所示
7.2 在struts应用中添加hibernate3.0支持
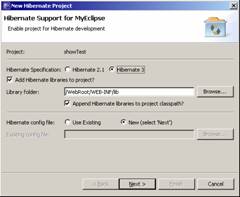
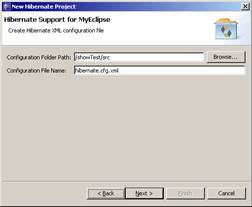
注意:hibernate.cfg.xml文件一定要存放到跟目录下,默认的也就是/web应用/src,这个部署这个应用的时候hibernate.cfg.xml才会出现在classes目录下,也就是hibernate存放配置文件的默认录入下.
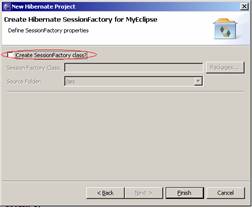
由于我们采用tomcat提供的数据库连接池,所以这里我们将是用自己创建的sessionfactory类。点击完成myeclipse会自动把hibernate所需的的类库加入到当前应用中。接下来就是配置hibernate连接数据库的所需的参数,以及性能参数(可选)。
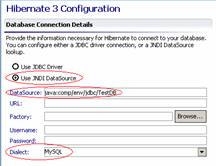
既然我们选用应用服务器所提供的数据库连接池,那么在这里我们只须要指定数据源的名字:java:comp/env/jdbc/testdb,其中jdbc/testdb就是我们在tomcat中配置的数据源,也就是我们上面提到的jdbc/testdb,资源名称一定要匹配。其他的参数由于已经在tomcat中配置过了,所以在这里就不用配置了,dialect一定要指定跟我们数据库匹配的语言。 既然我们选用应用服务器所提供的数据库连接池,那么在这里我们只须要指定数据源的名字:java:comp/env/jdbc/testdb,其中jdbc/testdb就是我们在tomcat中配置的数据源,也就是我们上面提到的jdbc/testdb,资源名称一定要匹配。其他的参数由于已经在tomcat中配置过了,所以在这里就不用配置了,dialect一定要指定跟我们数据库匹配的语言。
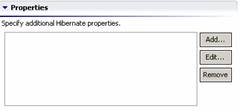
我们可以在这里配置hibernate一些调整性能的参数(针对不同的数据库有些属性可能无效)。
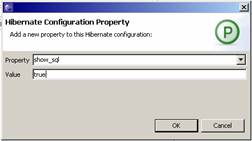
在这里我们设置show_sql为true,这样在开发调试过程成控制台可以打印真正在数据库端执行的sql语句便于查找问题。其他一些属性可以参阅http://www.hibernate.org。
到这里hibernate的配置已经基本完成,下面创建sessionfactory用来和数据库进行交互(hibernate官方文档提供)。
package com.db;
import org.apache.commons.logging.log;
import org.apache.commons.logging.logfactory;
import org.hibernate.session;
import org.hibernate.sessionfactory;
import org.hibernate.cfg.configuration;
public class hibernateutil {
private static log log =
logfactory.getlog(hibernateutil.class);
private static final sessionfactory sessionfactory;
static {
try {
sessionfactory = new configuration().configure().
buildsessionfactory();
} catch (throwable ex) {
log.error("initial sessionfactory
creation failed.", ex);
throw new exceptionininitializererror(ex);
}
}
public static final threadlocal session = new threadlocal();
public static session currentsession() {
session s = (session) session.get();
if (s == null) {
s = sessionfactory.opensession();
session.set(s);
}
return s;
}
public static void closesession() {
session s = (session) session.get();
if (s != null)
s.close();
session.set(null);
}
}
后面将会提到如何使用hibernateutil,下面建立我们所需的数据库
(略)我们可以使用208上的db_test_account这个数据库中的表message来测试我们的hibernate配置是否成功。数据库样例:
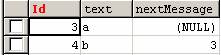
建表语句:
create table `message` ( `id` varchar(50) not null default '0', `text` varchar(50) default null, `nextmessage` int(4) default null, primary key (`id`) ) type=myisam
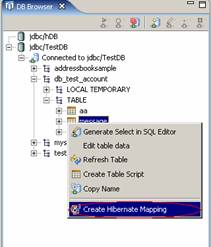
创建o/r mapping:
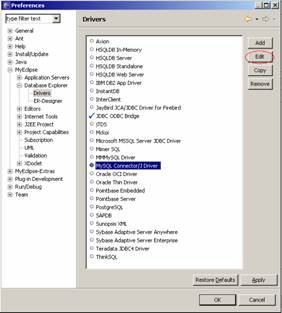
点击edit
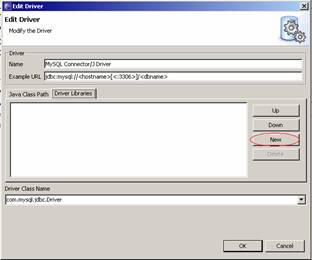
点击new添加mysql的驱动,保存
激活database explorer,保存。
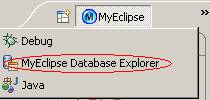
选择database explorer,创建数据库链接:
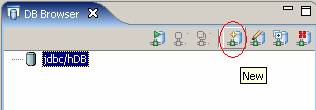
点击创建新的数据库,添加所需必要的参数

保存,然后右键点击该数据库选择open database,测试是否配置成功,如果不能连接查看该连接的配置参数。
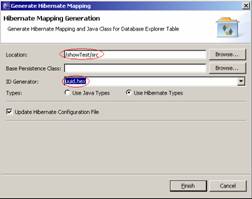
点击完成后myeclipse会自动生成pojo和map文件,并更新hibernate的配置文件(主要是加载map文件)。id generator选项可以根据你的需要进行选择,具体含义请参阅hibernate官方文档。下面建立一个测试用的jsp页面来看看hibernate是否好用。
//myjsp.jsp
<%@ page language="java" import="com.db.*" pageencoding="utf-8"%>
<%
string path = request.getcontextpath();
string basepath = request.getscheme()+":
//"+request.getservername()+":"+request.getserverport()+path+"/";
%>
<!doctype html public "-//w3c//dtd html 4.01 transitional//en">
<html>
<head>
<base href="<%=basepath%>">
<title>my jsp 'myjsp.jsp' starting page</title>
<meta http-equiv="pragma" content="no-cache">
<meta http-equiv="cache-control" content="no-cache">
<meta http-equiv="expires" content="0">
<meta http-equiv="keywords" content="
keyword1,keyword2,keyword3">
<meta http-equiv="description" content="this is my page">
<!--
<link rel="stylesheet" type="text/css" href="styles.css">
-->
</head>
<body>
<%
org.hibernate.session s = hibernateutil.currentsession();
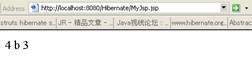
string hql = " from message where text='b'";
try {
org.hibernate.query query = s.createquery(hql);
java.util.list msglist = query.list();
hello.message msg = (hello.message) msglist.get(0);
out.println(msg.getid());
out.println(msg.gettext());
out.println(msg.getnextmessage());
} catch (org.hibernate.hibernateexception e) {
e.printstacktrace();
}
hibernateutil.closesession();
%>
</body>
</html>
正常的结果如下:

 闽公网安备 35060202000074号